Build Instructions using Docker and Windows 10 / 11
Setting up the build environment
This guide runs Docker Engine inside WSL 2 (Windows Subsystem for Linux), and all build commands are run from a WSL (Ubuntu) terminal. This is done in order to not have extra software running all the time when you do not need it. If you would rather use Docker Desktop or Podman Desktop, see Alternative: Docker Desktop or Podman Desktop below.
WSL 2 and Ubuntu
Click Start, type cmd, right-click Command Prompt and choose Run as administrator, then run:
Ubuntu will usually carry on installing straight away and ask you to create your Linux user name and password. These are only used inside this Ubuntu installation and don't need to match your Windows account. You will need the password whenever you run a command withsudo, such as when installing software later in this guide. If you are asked to reboot, do so, then open Ubuntu to finish the setup. To open the Ubuntu terminal later, choose Ubuntu from the Start Menu, open a new Ubuntu tab in Windows Terminal, or run wsl from a Command Prompt or PowerShell.
If you already have WSL installed, run wsl --update to make sure it is up to date.
wsl --install enables the Windows features WSL needs for you. If it fails, or you are on an older Windows 10 build, see Microsoft's Install WSL guide and the manual installation steps. Hardware virtualization must also be enabled in your PC's BIOS/UEFI settings. It usually is by default, but if WSL reports an error about virtualization, check there first.
To run the Linux Companion and Simulator, this guide uses WSLg, which is built into WSL 2 on Windows 11, and on Windows 10 (21H2 or later) when WSL is installed from the Microsoft Store. No separate X server is needed.
Docker Engine
In the Ubuntu terminal, install Docker Engine from Ubuntu's package repository:
If you would rather have the very latest version of Docker Engine, you can instead follow Docker's own Docker Engine install guide for Ubuntu. Either will work for this guide.Then allow your user to run docker without sudo:
Unable to find image 'hello-world:latest' locally, and then download it. This is expected. It then runs the container, which prints Hello from Docker! followed by This message shows that your installation appears to be working correctly. If you get a permission denied error instead, the group change above has not taken effect yet. Close all Ubuntu terminals, run wsl --shutdown from a Command Prompt, and try again. Cannot connect to the Docker daemon?
The Docker service is started by systemd, which is enabled by default in current Ubuntu WSL installs. If docker reports that it cannot connect to the Docker daemon, check that /etc/wsl.conf contains:
wsl --shutdown from a Windows Command Prompt and re-open Ubuntu. Git
Git is source code control software used to download the EdgeTX source code and keep it up to date. Install it in the Ubuntu terminal with:
Getting the EdgeTX source code
In the Ubuntu terminal, clone the source code repository into your Linux home directory:
This gets the latest development code on themain branch. If you want to build a specific release series instead, use its branch name in place of main here and in the update commands below, e.g. -b 2.12. Keep the repository in the WSL file system (e.g. ~/edgetx) rather than on a Windows drive under /mnt/c/..., as builds are much slower when working across the Windows/WSL boundary. You can still browse the files from Windows at \\wsl$\Ubuntu\home\<your user name>\edgetx, or by running explorer.exe . from the repository folder.
If you already have a local copy, update it to the latest version of the branch you are building, including the submodules:
Start the build container
Start the EdgeTX build container from your local repository, using the command for the container runtime you installed:
In the Ubuntu terminal:
cd ~/edgetx
docker run --name="ETXDocker" -it --rm \
  --mount src="$(pwd)",target="/src",type=bind \
  -w /src \
  -v /mnt/wslg/.X11-unix:/tmp/.X11-unix \
  -v /mnt/wslg:/mnt/wslg \
  -e DISPLAY=:0 \
  -e WAYLAND_DISPLAY=wayland-0 \
  -e XDG_RUNTIME_DIR=/mnt/wslg/runtime-dir \
  -e PULSE_SERVER=/mnt/wslg/PulseServer \
  -e CMAKE_BUILD_PARALLEL_LEVEL=$(nproc) \
  ghcr.io/edgetx/edgetx-dev bash
In PowerShell, from your local repository folder:
docker run --name="ETXDocker" -it --rm `
  --mount src="$(pwd)",target="/src",type=bind `
  -w /src `
  -v /run/desktop/mnt/host/wslg/.X11-unix:/tmp/.X11-unix `
  -v /run/desktop/mnt/host/wslg:/mnt/wslg `
  -e DISPLAY=:0 `
  -e WAYLAND_DISPLAY=wayland-0 `
  -e XDG_RUNTIME_DIR=/mnt/wslg/runtime-dir `
  -e PULSE_SERVER=/mnt/wslg/PulseServer `
  -e CMAKE_BUILD_PARALLEL_LEVEL=$env:NUMBER_OF_PROCESSORS `
  ghcr.io/edgetx/edgetx-dev bash
In PowerShell, from your local repository folder:
podman run --name="ETXDocker" -it --rm `
  --mount src="$(pwd)",target="/src",type=bind `
  -w /src `
  -v /mnt/wslg/.X11-unix:/tmp/.X11-unix `
  -v /mnt/wslg:/mnt/wslg `
  -e DISPLAY=:0 `
  -e WAYLAND_DISPLAY=wayland-0 `
  -e XDG_RUNTIME_DIR=/mnt/wslg/runtime-dir `
  -e PULSE_SERVER=/mnt/wslg/PulseServer `
  -e CMAKE_BUILD_PARALLEL_LEVEL=$env:NUMBER_OF_PROCESSORS `
  ghcr.io/edgetx/edgetx-dev bash
You should now be in a shell inside the container, with a prompt that looks a little like root@8c2f137e0944:/src#. Your local repository is available in the container at /src (set by the --mount option), and the shell starts in that folder (set by -w /src).
The -v options and the DISPLAY, WAYLAND_DISPLAY, XDG_RUNTIME_DIR and PULSE_SERVER settings give the container access to WSLg, so that Companion and Simulator can open windows on your Windows desktop and play sound.
CMAKE_BUILD_PARALLEL_LEVEL sets how many compile jobs run at once to the number of CPU cores on your system. This speeds up builds, and also stops the --parallel build commands used in this guide from starting an unlimited number of jobs, which can use up all available memory and cause the build, or even the whole system, to lock up.
Only building firmware?
If you don't need to run Companion or Simulator, you can leave out the WSLg options:
docker run --name="ETXDocker" -it --rm --mount src="$(pwd)",target="/src",type=bind -w /src -e CMAKE_BUILD_PARALLEL_LEVEL=$(nproc) ghcr.io/edgetx/edgetx-dev bash
podman instead of docker for Podman, and $env:NUMBER_OF_PROCESSORS instead of $(nproc) in PowerShell. Building an older release?
The commands above use the latest build container image, which matches the main branch. If you are building a release branch, use the image tag for that release by adding it to the end of the image name, e.g. ghcr.io/edgetx/edgetx-dev:2.12 or ghcr.io/edgetx/edgetx-dev:2.11 (for 2.10, use :2.10.0). Older releases need older build tools (e.g. EdgeTX 2.10 and 2.11 use Qt 5), so they may not build with the latest image.
Start the container with a single command
To avoid typing the full docker run command each time, you can add it to your Ubuntu shell as a command called etx-docker. Run this once in the Ubuntu terminal:
cat >> ~/.bashrc << 'EOF'

# Start the EdgeTX build container in the current folder
# Usage: etx-docker [image tag], e.g. etx-docker or etx-docker 2.12
etx-docker() {
  docker run --name="ETXDocker" -it --rm \
    --mount src="$(pwd)",target="/src",type=bind \
    -w /src \
    -v /mnt/wslg/.X11-unix:/tmp/.X11-unix \
    -v /mnt/wslg:/mnt/wslg \
    -e DISPLAY=:0 \
    -e WAYLAND_DISPLAY=wayland-0 \
    -e XDG_RUNTIME_DIR=/mnt/wslg/runtime-dir \
    -e PULSE_SERVER=/mnt/wslg/PulseServer \
    -e CMAKE_BUILD_PARALLEL_LEVEL=$(nproc) \
    ghcr.io/edgetx/edgetx-dev:"${1:-latest}" bash
}
EOF
source ~/.bashrc
etx-docker 2.12. Building the firmware
Building the firmware is done in two steps: first you configure the build, choosing which radio to build for and any build options, then you build it.
Run the following commands in the container, from the /src folder it starts in.
Configure
To configure the build, you need to at least specify the radio target, and can also select or de-select a number of build-time options. A full list of available options is documented on the Compilation Options page.
As an example, to configure a build for the RadioMaster TX16S in the build-output folder:
If you want to include the debug symbols, use -DCMAKE_BUILD_TYPE=Debug instead.
To build for other radios, you just need to specify the appropriate values for PCB and PCBREV for your radio. It is best to use a different build folder for each radio.
Which PCB and PCBREV values should I use?
tools/build-common.sh lists the CMake options for every supported radio. Search it for your radio's name (e.g. tx16s) to find the matching -DPCB and -DPCBREV values.
Alternatively, the repository includes CMake presets for all supported radios, so you can configure with just the radio name, e.g. cmake --preset tx16s. Run cmake --list-presets to see them all, and see Building EdgeTX for more details.
Build firmware
To build the firmware, issue:
This process can take some minutes to complete. If successful, you should find a firmware binary firmware.bin in the build-output/arm-none-eabi folder, that you can flash onto your radio.
UF2 firmware
Some newer radios, such as those based on the STM32H7 (e.g. RadioMaster TX16S MK3, TX15 and GX15, and Jumper T15 Pro), also produce a firmware.uf2 file in the same folder. For these radios, use the .uf2 file instead of the .bin file.
It's a good idea to rename the firmware file, so that it is easier later to see the target radio and which options were baked into it. For this, issue e.g.:
(usefirmware.uf2 and a .uf2 extension instead if your radio uses UF2 firmware) The firmware is now built and in your local repository under build-output. From Windows, you can find it at \\wsl$\Ubuntu\home\<your user name>\edgetx\build-output.
Listing all build options
Once the firmware has been built, you can save a list of all the build options available for your radio, and their current values, to a text file in your repository:
Flashing the firmware to your radio
Before flashing, make sure your radio's SD card has the matching SD card content. See the EdgeTX SD card repository for which zip file your radio needs, and download it from the latest release.
You can use EdgeTX Buddy, EdgeTX Companion, or STM32CubeProgrammer to flash the firmware to your radio. For step-by-step instructions, see Installing and Updating EdgeTX in the EdgeTX manual. STM32H7-based radios (those using .uf2 firmware) have their own update process.
Build Companion and Simulator
EdgeTX 3.0 and later (main branch)
You can build the radio simulator library, Companion and Simulator all in one step:
This will configure and download extra dependencies as needed. Alternately, if you only want to build the simulator module at this point, you can run:
The WASM simulator module is built into build-output/wasm/wasm-build/ but Companion looks for it in build-output/native/. Copy it across before launching Companion or Simulator:
If you want to build simulator modules for multiple radio targets (so they are all available in Companion), the helper script tools/build-wasm-modules.sh can build all supported targets in one go:
To build only some radios, list them in the FLAVOR environment variable, separated by semicolons. The quotes are required. The radio names are the same ones used in tools/build-common.sh:
The script's two arguments are the source folder (. for the current folder) and the folder to put the .wasm files in.
Copy the .wasm files to build-output/native/ before launching Companion:
Legacy: EdgeTX 2.10 to 2.12
In EdgeTX 2.10 to 2.12, each radio you want to use in Companion and Simulator needs its own radio simulator library (libsimulator). Companion only includes the radios whose simulator libraries were already built when Companion itself was built, so always build the simulator libraries first, then Companion and Simulator.
Single radio
For a single radio, configure the build for that radio as described in Configure, then build the simulator library, Companion and Simulator in one step:
Multiple radios
To include more than one radio, configure and build the simulator library for each radio in turn, using the same build folder, and then build Companion and Simulator once at the end. For example, for the Jumper T20 and T15:
# Jumper T20
rm -f build-output/native/CMakeCache.txt
cmake --fresh -S . -B build-output -Wno-dev -DPCB=X7 -DPCBREV=T20 -DCMAKE_BUILD_TYPE=Release
cmake --build build-output --parallel --target libsimulator

# Jumper T15
rm -f build-output/native/CMakeCache.txt
cmake --fresh -S . -B build-output -Wno-dev -DPCB=X10 -DPCBREV=T15 -DCMAKE_BUILD_TYPE=Release
cmake --build build-output --parallel --target libsimulator

# Companion and Simulator, including both radios
cmake --build build-output --parallel --target companion --target simulator
build-output/native/CMakeCache.txt before each configure makes sure no build options are carried over from the previous radio. The simulator libraries already built are kept, so each radio adds to the list. Adding radios later
Companion only picks up the list of radios when it is first built. If you have already built Companion and want to add another radio, build its simulator library as above, then delete build-output/native/companion/src/hwdefs.qrc before building Companion and Simulator again. Alternatively, start again with a new build folder.
Launching Companion
In the container, change into the native directory and run Companion, where <ver> is the EdgeTX version as digits (e.g. 30 for 3.0, or 212 for 2.12):
Keep your Companion settings between sessions
Companion saves its settings, including your radio profiles, in /root/.config/EdgeTX inside the container, which is deleted when the container exits. To keep them, create a folder for them in the Ubuntu terminal:
docker run command (before the image name): In PowerShell (Docker Desktop or Podman Desktop), run mkdir "$env:APPDATA\EdgeTX-docker" once, and add -v "$env:APPDATA\EdgeTX-docker:/root/.config/EdgeTX" ` instead. Launching the Simulator
The simulator needs the SD card content for your radio. Download the matching zip from EdgeTX SD card releases and extract it into your local repository, e.g. to ~/edgetx/simu_sdcard/horus in the Ubuntu terminal. Inside the container, this is /src/simu_sdcard/horus.
Note
Keep the SD card content inside your local repository. The container's own file system (including its home directory ~) is deleted each time the container exits.
From the same native directory, run:
/src/simu_sdcard/horus. 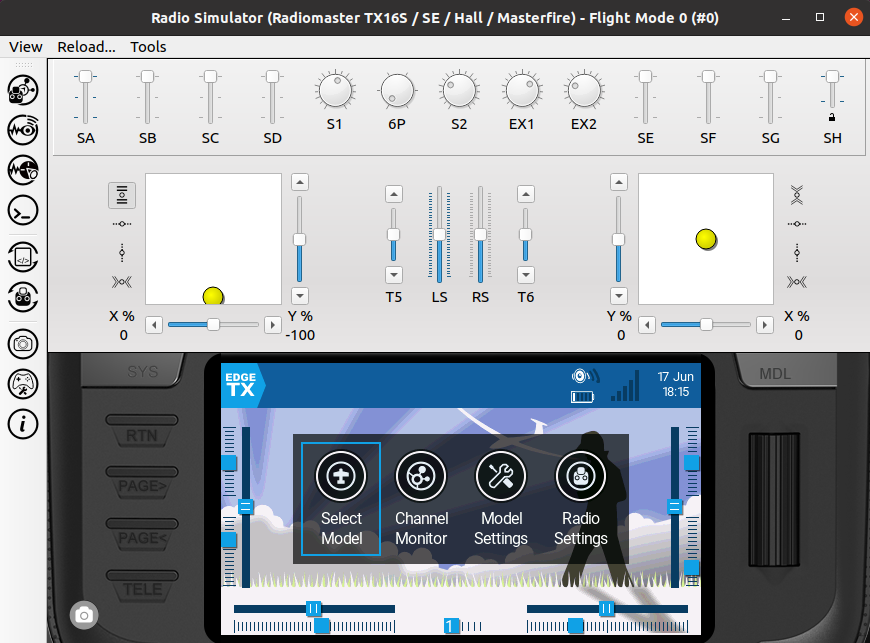
Running Companion or the Simulator again later
You don't need to rebuild each time. Start the container as described in Start the build container, then launch Companion or the Simulator as above.
Troubleshooting
- Should you get a message like
container name "/ETXDocker" is already in use, open another Ubuntu terminal and enterdocker stop ETXDocker - If the build fails after updating your repository, or the build tools seem out of date, update the build container image by opening an Ubuntu terminal and entering
docker pull ghcr.io/edgetx/edgetx-dev - If builds fail with errors about running out of memory (e.g.
Killedorinternal compiler error), or the build or your PC locks up, reduce the number of compile jobs. By default, WSL can only use half of your PC's memory, which may not be enough to run one job per CPU core. In the container, run e.g.export CMAKE_BUILD_PARALLEL_LEVEL=4before building, and try a lower number if it still fails. - If Companion or Simulator fail with an error like
could not connect to display, check that WSLg is working by runningwsl --updateand thenwsl --shutdownfrom a Windows Command Prompt, re-opening Ubuntu, and making sure you started the container with the WSLg-vand-eoptions shown above.
Alternative: Docker Desktop or Podman Desktop
Instead of installing Docker Engine inside WSL, you can use a Windows desktop application to run the container. Either of the following will work:
- Docker Desktop for Windows (free for personal use, education and small businesses; check the license terms if using it at work)
- Podman Desktop (free and open source)
Both use WSL 2 under the hood, and the installer will normally enable it for you. With these, the steps above change as follows:
- Commands are run from PowerShell instead of the Ubuntu terminal. Tip: Shift + right-click in a folder in File Explorer to get an "Open PowerShell window here" option in the context menu.
- Install Git for Windows (or run
winget install --id Git.Git --source winget), and clone the repository to a folder on your Windows drive. - Your repository, build output and firmware files are in that Windows folder, so you can ignore the
\\wsl$\Ubuntu\...paths mentioned above. The SD card content for the simulator also goes in that folder, and is still available at/src/...inside the container. - If you are using Podman, replace
dockerwithpodmanin each command. - To start the container, use the Docker Desktop or Podman Desktop tab in Start the build container.
- If you cannot use WSLg (e.g. an older Windows 10 build), you can use an X server such as GWSL instead. Install and run it, disable access control during its setup, then leave out the WSLg
-vand-eoptions when starting the container, and in the container runexport DISPLAY=<your Windows IP address>:0.0(find your IP withipconfig) before launching Companion or Simulator. Audio will not work in this setup.
References
- Building EdgeTX: overview of building EdgeTX on all platforms, including CMake presets and build options
- EdgeTX build-edgetx repository: source of the
edgetx-devbuild container image used in this guide